Soft purple eye makeup – tutorial

natural purple makeup tutorial

*adlink

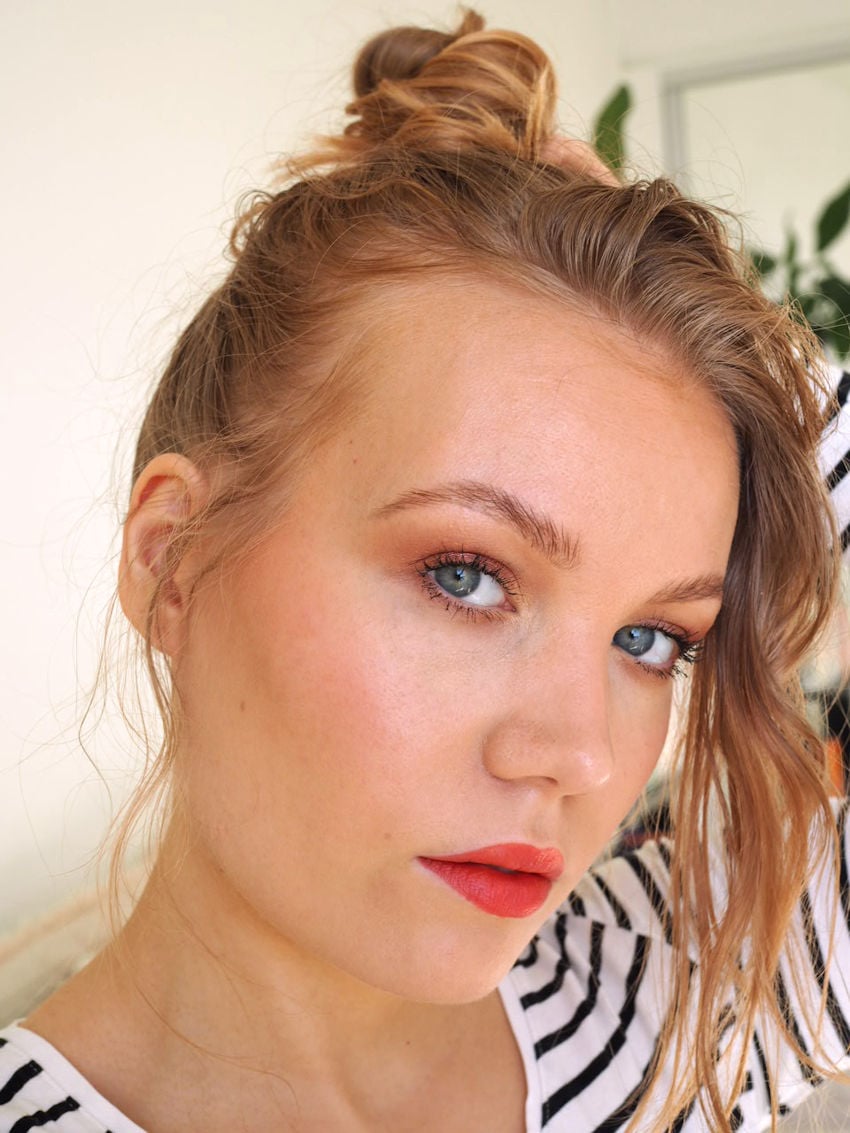
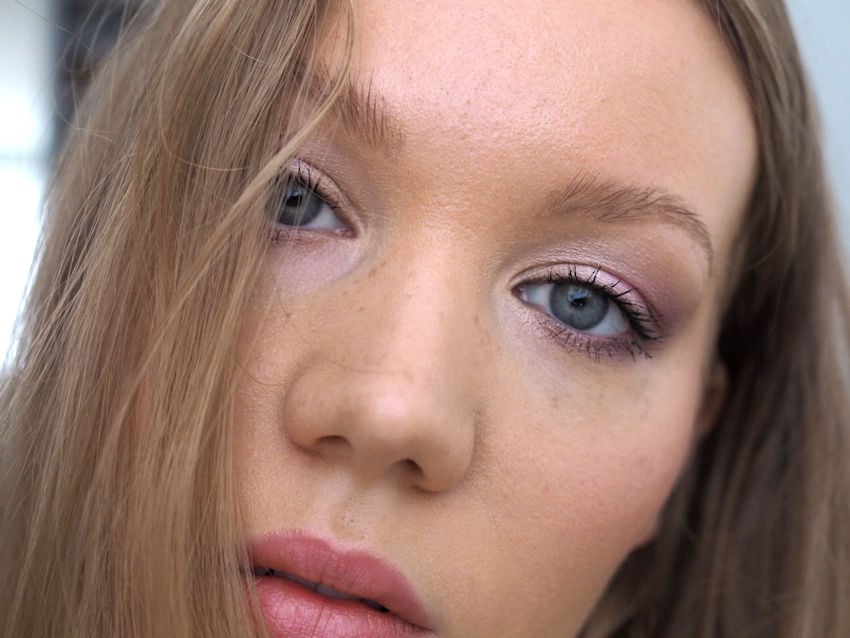
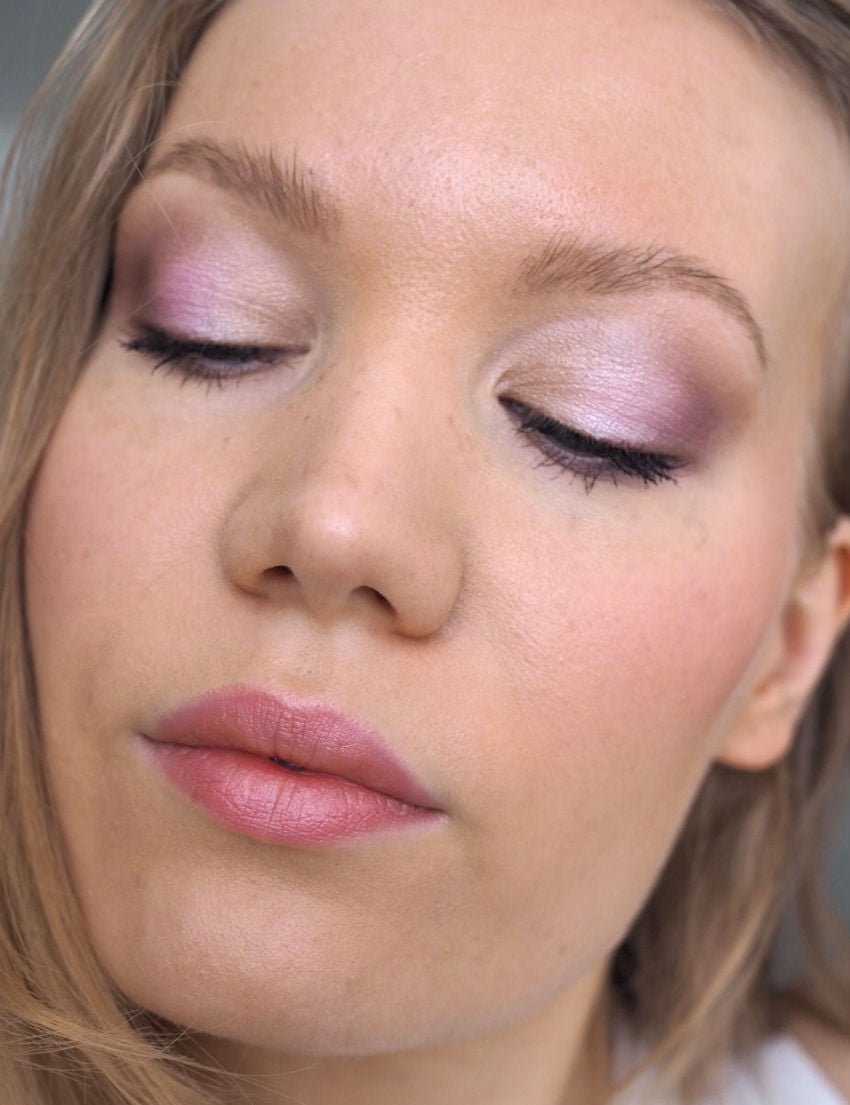
This soft purple eye makeup tutorial is the perfect example of using colors in a more neutral way. Subtle purple tones suit surprisingly many eye colors. I tend to look best in warm colors, but I made these cool colors work for me by adding just a bit of warmth in the shape of gold eyeshadow.

So instead of the usual brown – go on and try purple. Just make sure to add warm or cool colors in there, whatever looks best on you.

light purple eye makeup tutorial


Soft purple eye makeup tutorial

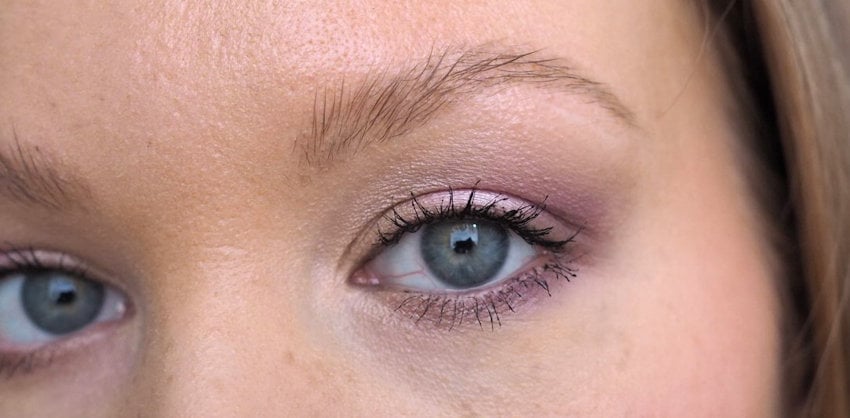
Besides hiking and barbecue, I’ve been loving purple eyeshadow lately. There really isn’t enough purple eye makeup tutorials on my blog to prove just how much I love it (yet!). In this look I used more of a muted plum purple. Plum goes well with brown colors. That makes this look easier, because you can use brown colors to blend the purple better to your skin. (So yes, we’re using the good old brown – but just as a transition color.)

soft purple eye makeup tutorial

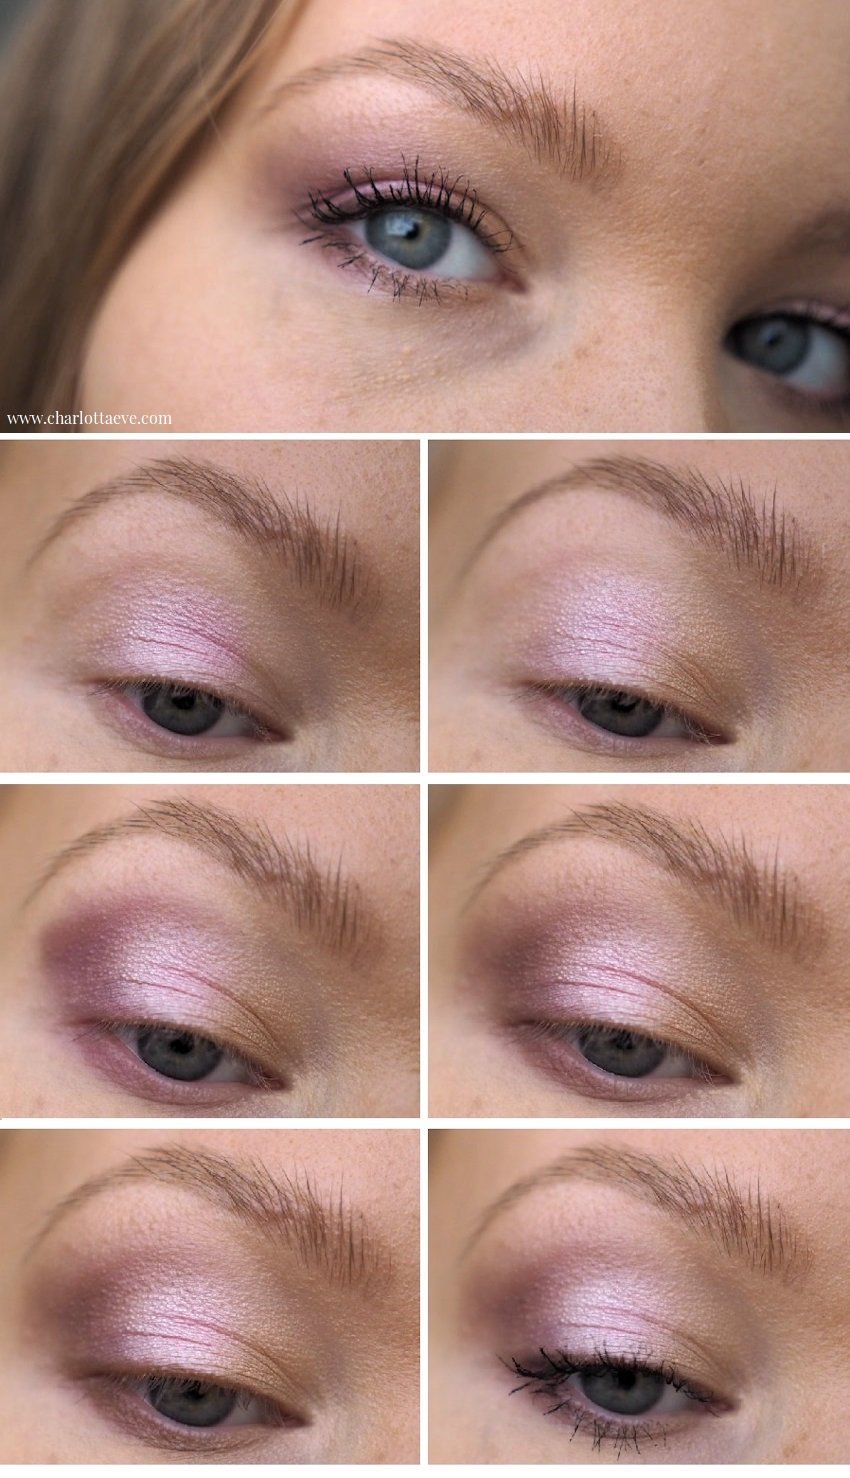
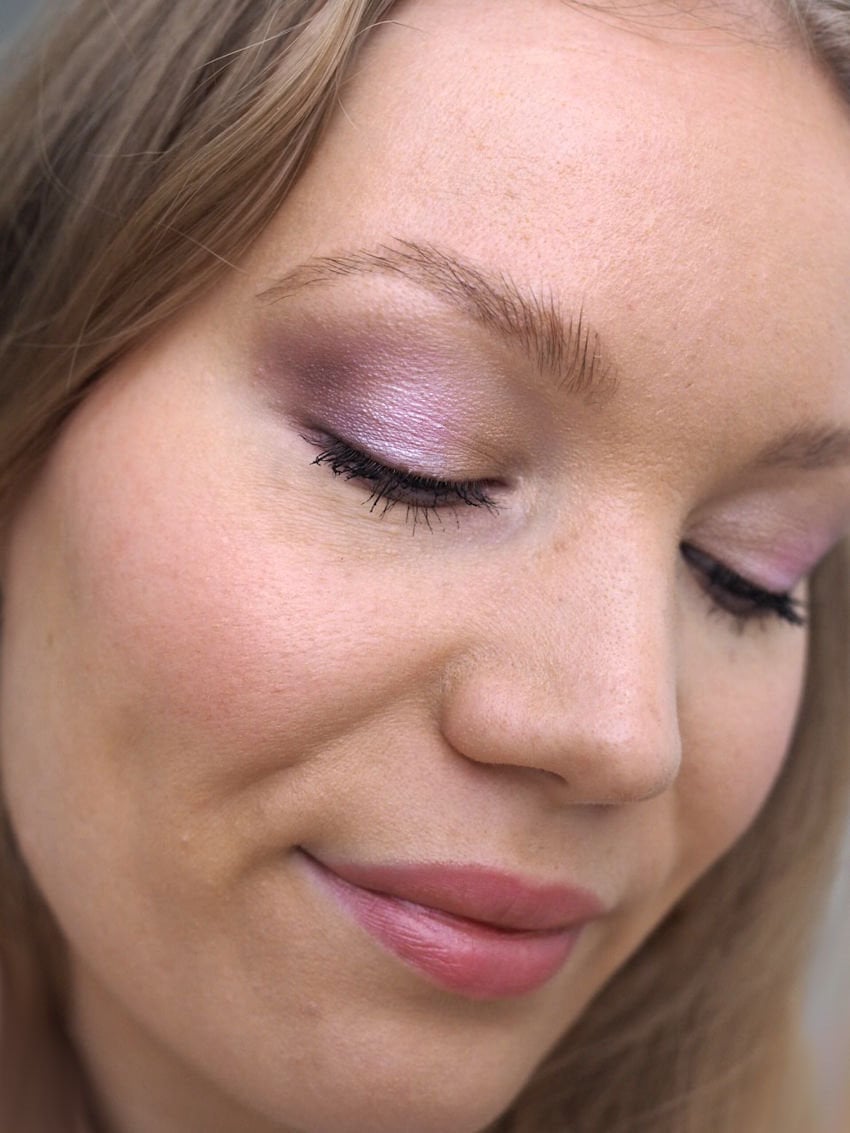
  1. Apply pink eyeshadow on half of your lid, leaving a bit of a gap in the outer corner.
  2. Next apply gold eyeshadow on the other half (inner corner).
  3. Fill in the outer corner gap and shade your eye with a purple eyeshadow.
  4. Blend well. You can also use a light brown to blend the purple to your skin better.
  5. Don’t forget your lower lid – add some purple there as well.
  6. And that’s about it!

Depending on your eye shape, bring the colors high enough so that some of it is visible when your eye is relaxed. On my deep set eye I bring the colors quite high.

soft purple makeup

soft purple makeup

Purple palettes to recreate this look:

*Huda Beauty Lilac Obessions Palette
*Natasha Denona Love Eyeshadow Palette
*Urban Decay Naked Ultraviolet Palette
*Norvina Pro Pigment Palette Vol 1

On my lips I wore:
*Jane Iredale Triple Luxe Lipstick in Rose
& on top of that
Zuii Organic Lux Lipstick in Bridget


light purple eye makeup


Brow lift with makeup; Benefit 24HR Brow Setter Gel review

brow lift with brow gel benefit brow setter

*adlink

I have found a gel that makes your brows so fluffy, it passes for a brow lift.

I love to treat my brows with a brow lamination, because the results last for weeks. However, if you want to achieve the look just with makeup, without hassling with soap or lash glue (we’ve all been there), Benefit Brow Setter Gel gets the job done.

The recipe for beautiful bushy brows is simple: just brush your brow hairs up with the gel and then fill them in.

Benefit 24Hr Brow Setter Gel review

Benefit 24hr Brow Setter Gel
– brow gel that actually tames the brow hairs up & locks them in place

Benefit’s 24HR Brow Setter brow gel is so good, it’s a bit baffling. It keeps the brow hairs in place, even when you want them to point straight up. The effect also lasts – my brows always look great the whole day. Basically what you get is a brow lift with makeup.

When my beauty therapist, the one who I go for the brow lift treatment, saw my brows done with the gel, I’m sure for a second she thought I had gotten a brow lift elsewhere. Excitedly I told her it’s just brow gel (“and doesn’t it look exactly like I’ve had a brow lift?”).

fluffy brows laminated look with makeup
Fluffy brows with makeup. Back when my hair was very ginger.. Why don’t hair colors last on my hair though?

The gel is clear and quite thick. It’s a bit glue-like, but more manageable. It doesn’t show up on the hairs or skin (like glue does in my experience),  other than giving them shine and texture. It enhances the brows, but that’s exactly what we want for fluffy and bushy brows.

This gel comes with a special brush that has different sides to it: there’s longer and shorter bristles, along with a flat surface on both sides. That flat surface is the key to making a brow lift effect.

benefit brow setter clear gel brush

How to fake a brow lift with the Benefit Brow Setter Gel:

I first brush the gel through my brows. And then, I press the flat surface on my brows and skin to set the brow hairs in place. And amazingly, they stay like that.

Note: obviously if you don’t want such dramatic effect, you don’t have to press the brush against your skin, you can just brush your hairs up or to the side. You still get a nice lift that looks more natural. For example Alice from the Notes by Alice blog used the gel in a more natural way on her review.

The gel dries quite quickly, but I think that’s a good thing, because I get my brows done very fast. I do my brows in sections, starting from the front of my brows. That way I don’t have to panic about the gel drying too soon.

benefit brow setter gel before after

Brow lift with makeup – Fluffy brows with gel & brow pencil

After the gel is dried, I fill in my brows with a thin brow pencil. Even though the gel dries to a bit of a cast, I can still apply my brow product on the brows. After I have my brow hairs pointing up, it’s easy to clean up that brow line and fill in any blanks. I also need less product, because my brow hairs are showing their full potential.

If you struggle with your brow shape and are not sure where the product should go, this brow tutorial might be helpful.

brow lift with makeup benefit brow setter gel

You can get Benefit’s gel in two sizes. At first I (accidentally) bought the mini size, but now I’ve already gotten the full sized version. I have a feeling I will be repurchasing this product multiple times.


If you’re looking for the best brow gel, that actually tames the brow hairs and lasts, and looks like a brow lift, this brow gel is it.


Shop the gel at Sephora:
*Benefit 24-HR Brow Setter Gel
*Benefit 24-HR Brow Setter Gel Mini

Thin brow pencils for filling in the brows:
*Benefit Precisely, My Brow Pencil Waterproof
*Anastasia Beverly Hills Brow Wiz Pencil


Scroll to top