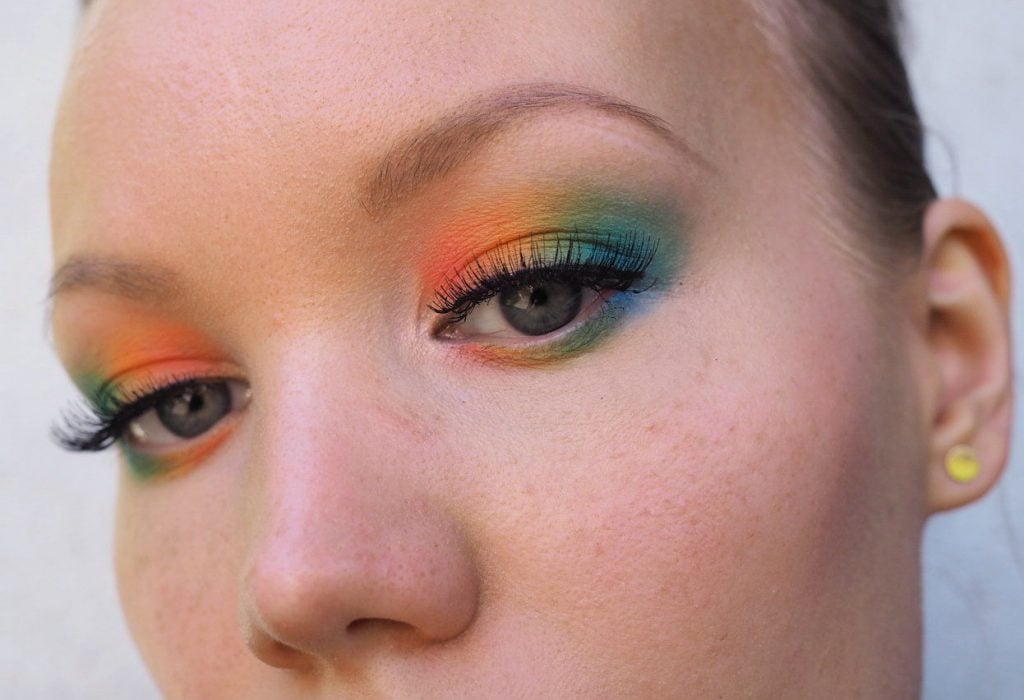
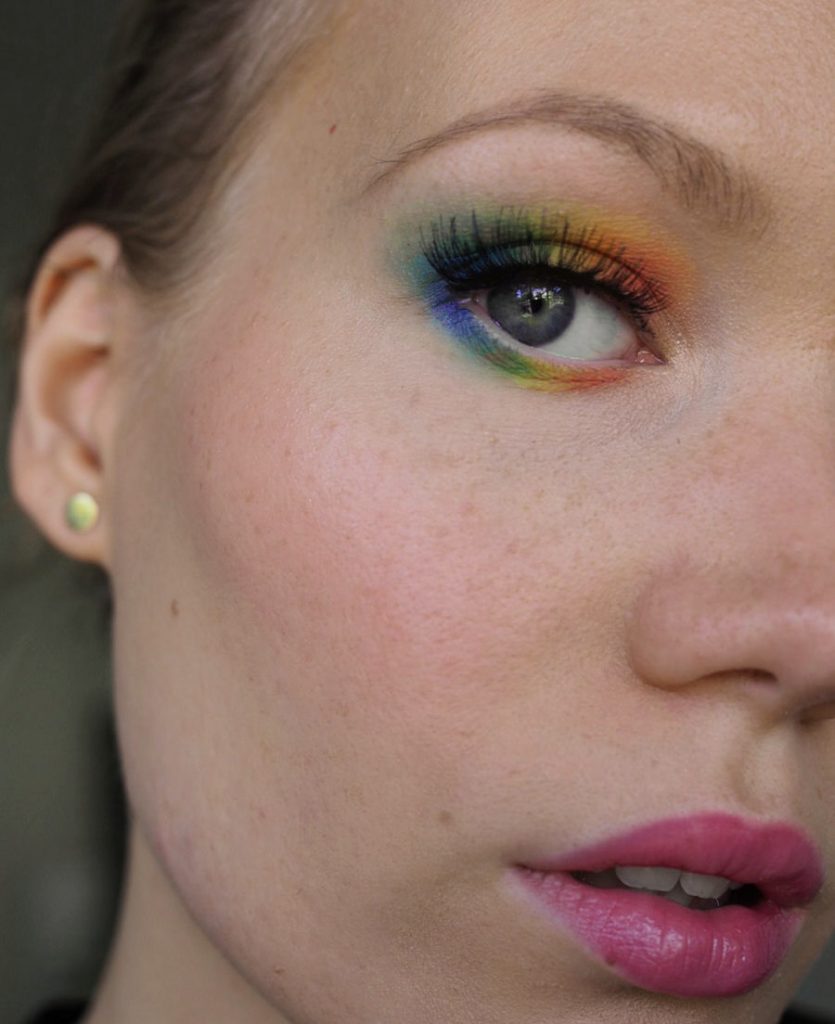
I don’t always play with colors, but when I do, it’s a full rainbow. No but seriously, it happens. I don’t wear makeup for a long time, then I feel like doing something cool – and then I end up with something like this. Glad I did though, I feel my inspiration slowly coming back and I already have ideas for more fun, colorful looks.
For this look I used my *NYX Off Tropic Palette. It honestly has such good pigment. I primed my other eye white pencil, but for the other eye I didn’t use any white base whatsoever (yes, I forgot, okay?). And the colors turned out just as bright. So for anyone looking for colorful palettes, my vote goes for the inexpensive NYX palettes.
Palette was gifted to me. *adlink
Colorful rainbow eye tutorial
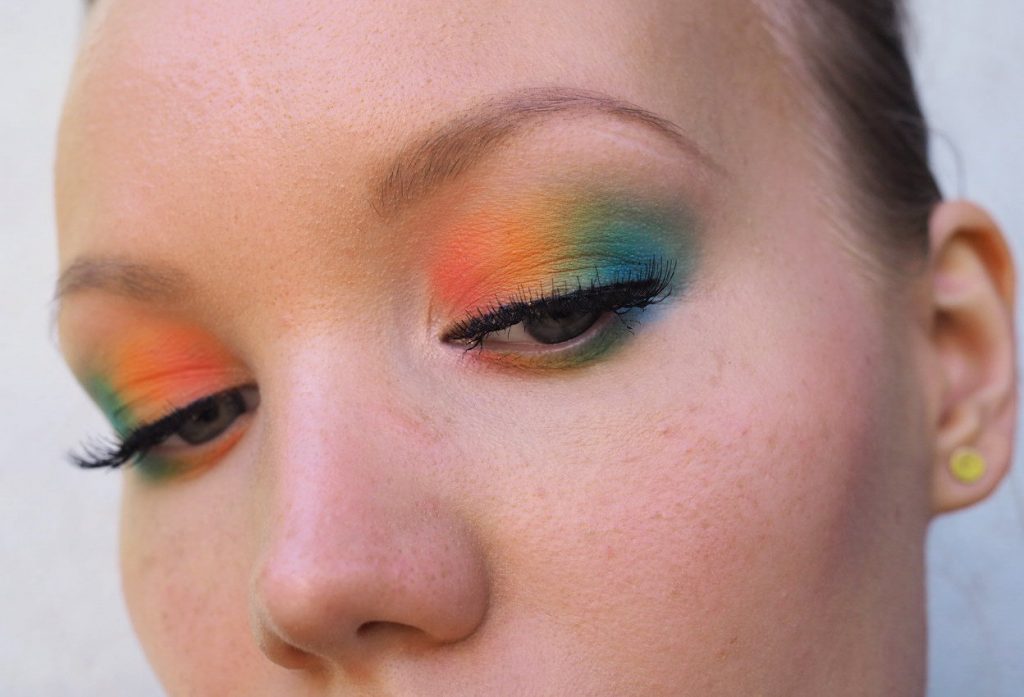
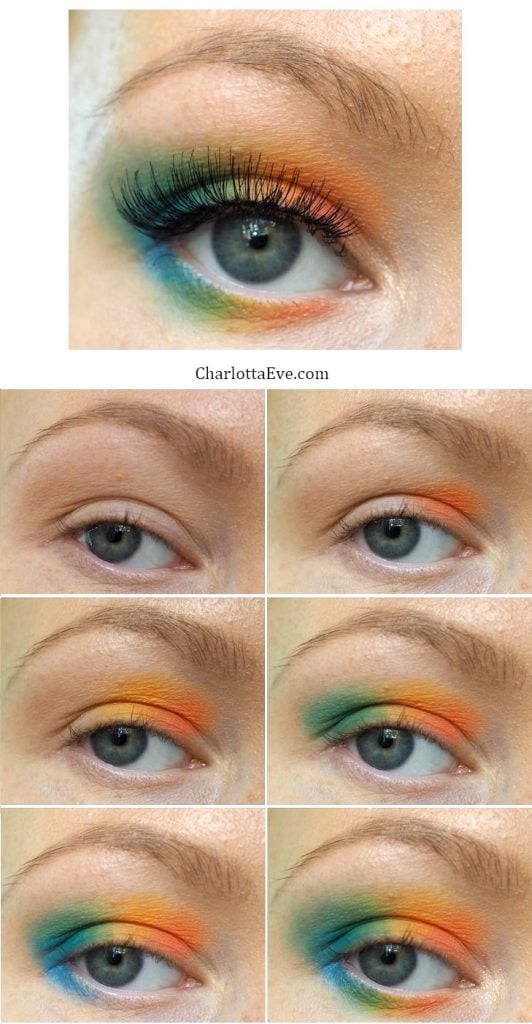
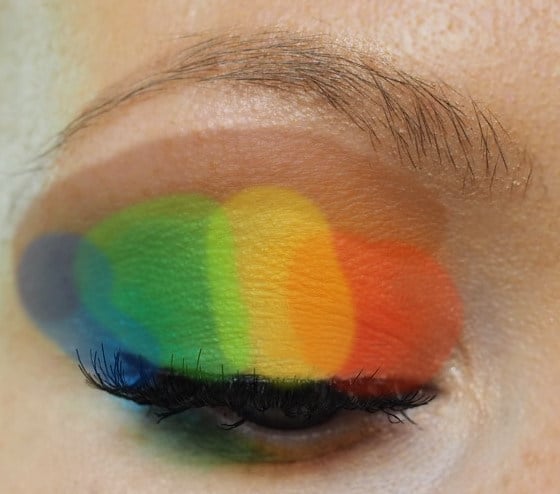
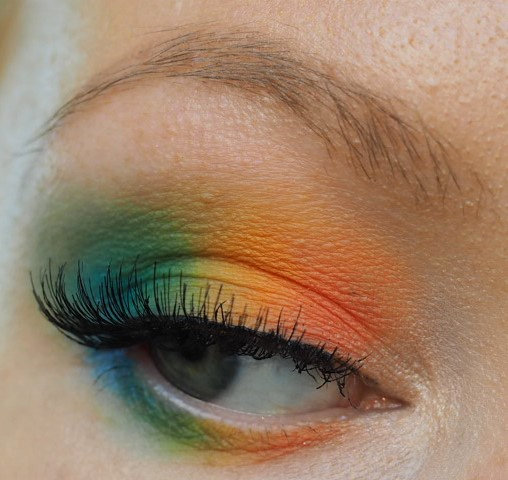
This look is honestly quite easy to do. The key is in the color placement. For example: I put green next to yellow, and blue next to green. Because when you mix up yellow and blue, you get green. That makes it look harmonious.
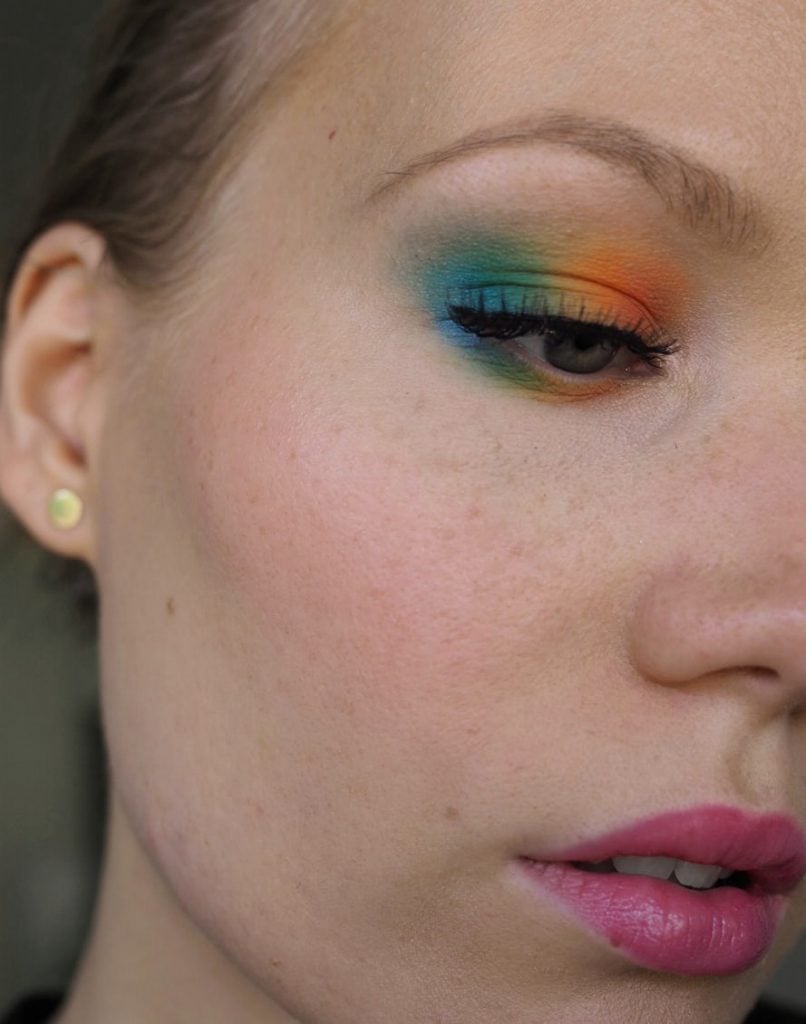
You can apply a very light brown transition color to your crease area (or fake crease, in my case, with my deep set eyes), but it’s optional. I applied the tiniest amount of light brown under my brow bone, but it doesn’t really show up on camera.
Then you can just start applying the colors one by one. First orange, then yellow, green and blue. I didn’t blend too much – rather I kind of tapped around the edges of where two colors collided.
Finally I applied a light shimmer in my inner corner, lined my eyes with a black liner and added falsies. I think black liner and lashes are very important in this makeup – it balances the whole look and makes it look more put together.
This photo shows you better where I applied my transition color (that light brown). Again, it’s because of my eye shape. You can read more about working with deep set and hooded eyes here and here.
Did you already see my previous tutorial? It was about how to apply mineral makeup & a quick luxury makeup. That tutorial is for the whole face, rather than just for eyes. I also want to remind you of my big post for brides. I gathered the best bridal makeup products and showed you a bridal makeup look on a video there. And I just want to mention that all the product recommendations are based on actual experience on working with a lot of brides.
And finally – if you’re interested in good coffee, go participate in my giveaway here!
P.S. What is everyone up to this weekend? I’m travelling to my hometown to celebrate my grandpa’s and grandma’s 80th birthday. Roadtrip, here I come! Luckily 7 hours in a car feels easy after being used to driving all the way up north, like last year, when we drove to Lapland.
Who knew luxury makeup could be organic and sustainable?
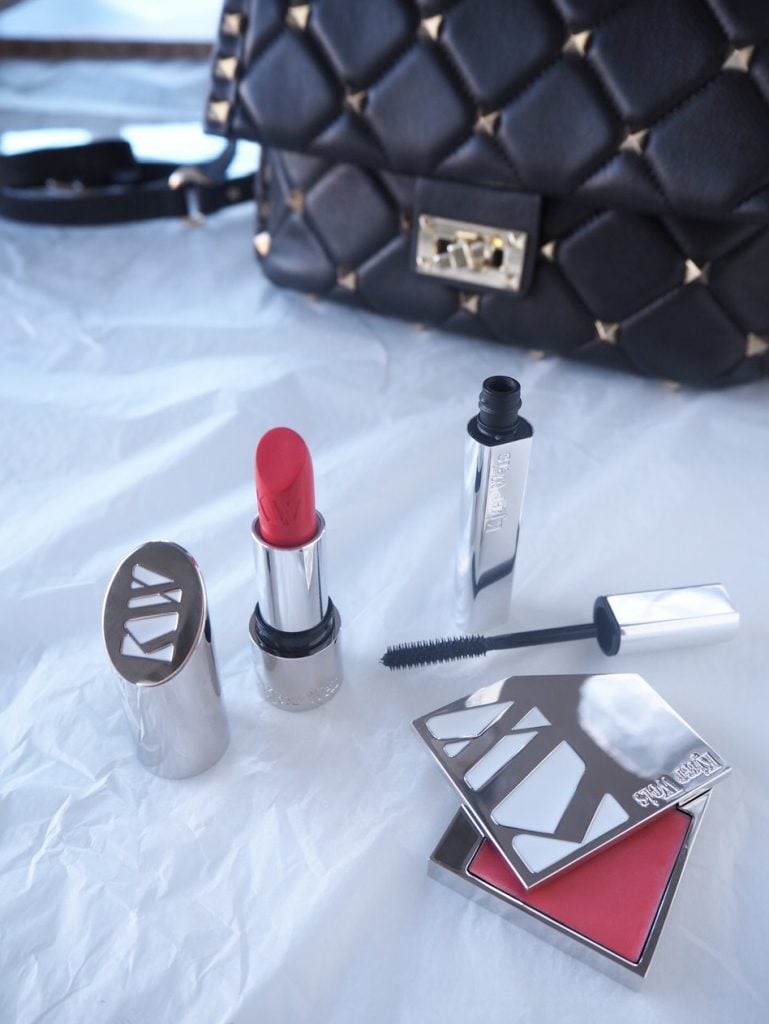
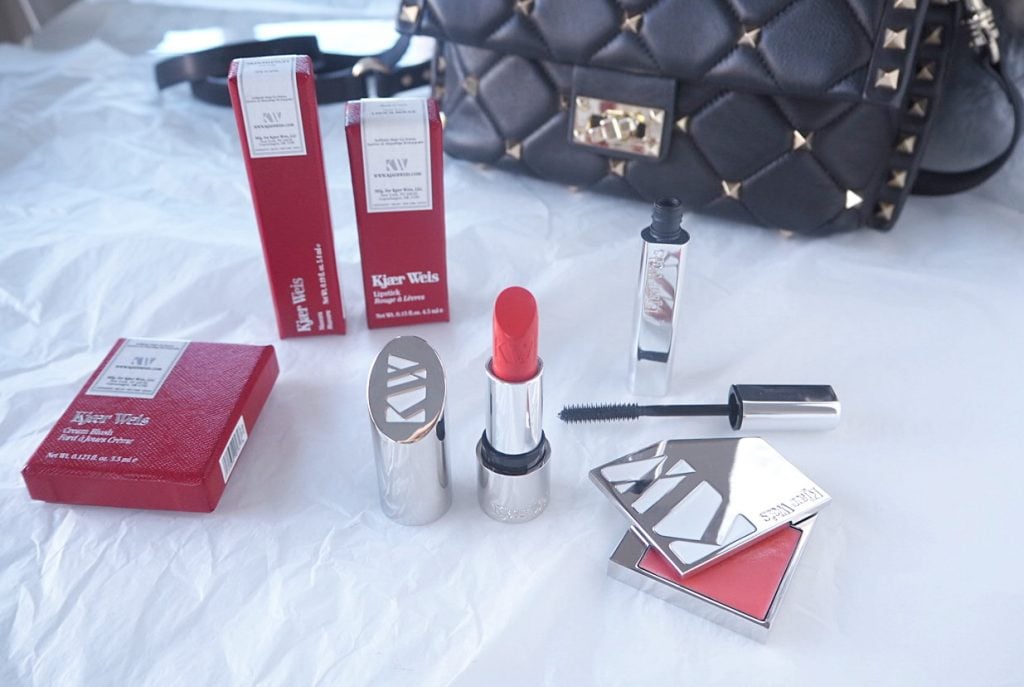
I mean, I guess I shouldn’t be surprised, but I’m still very excited about the Kjaer Weis products I received. And here’s the most important thing: the packaging is refillable! That’s also why it’s extra beautiful. It’s something you are keeping, not tossing away, like you usually do with used makeup products. You just simply buy a refill and keep using that beautiful packaging.
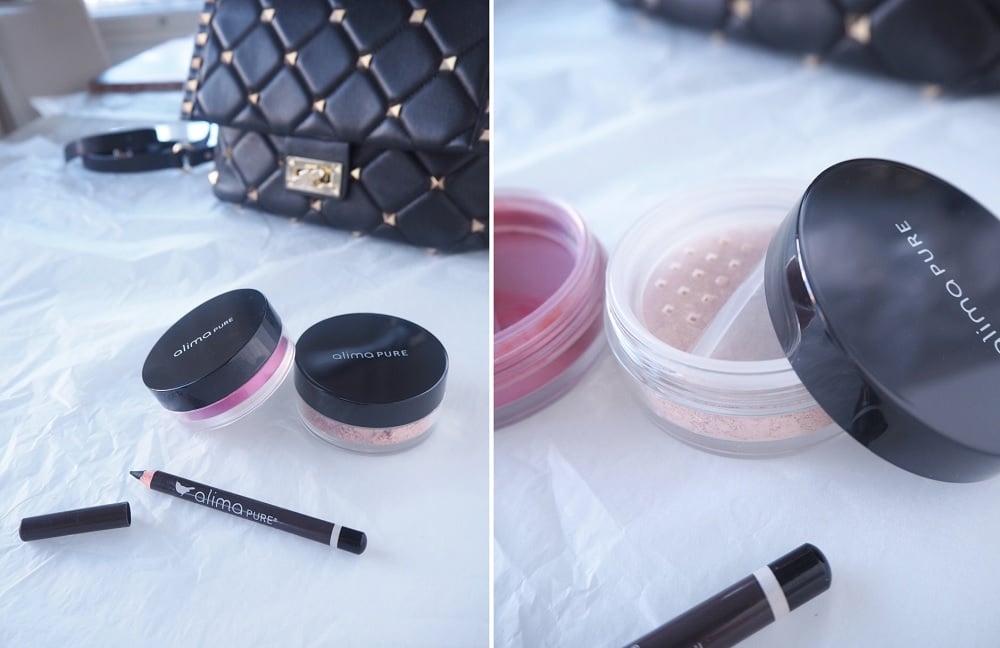
Genius. And quite simple, really. That is why I wanted to create this simple makeup look with the products. Besides the Kjaer Weis products, I also used a mineral makeup base and a black pencil (that’s been my favorite for years!) from Alima Pure.
I wrote a bit more about the product at the end of this post, but for now, let’s get to the step by step photos of this simple makeup.
Products are pr-samples. Links are adlinks.
Some beautiful Alima Pure products. Garnet blush, mineral foundation and the best black pencil I know.
How to apply mineral makeup?
I love mineral makeup for a couple of reasons. It looks natural and beautiful, because it reflects light. It also kind of blends on the skin making it look even more perfect after an hour or two of application. And – it’s naturally antibacterial! As someone who has battled acne and bad skin, a makeup product that is acne-safe is always a plus.
Mineral makeup is also very quick and easy to apply.
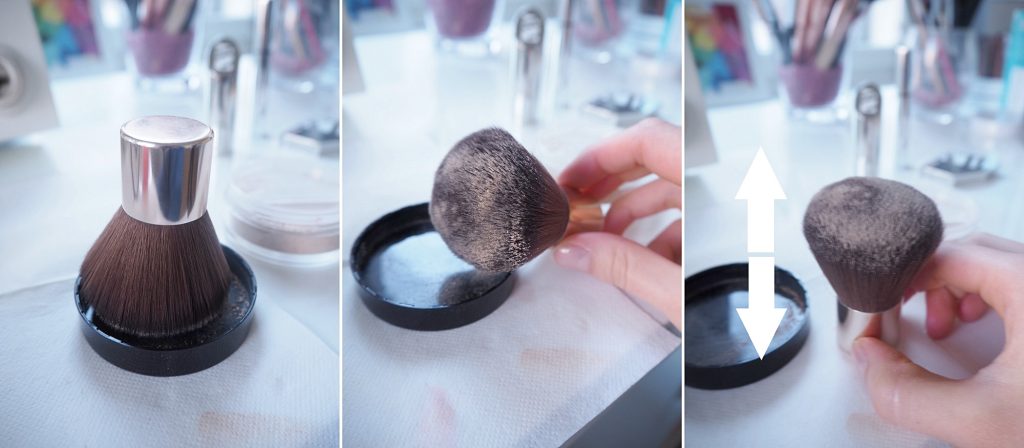
Take some mineral powder on the cap and swirl your brush in it. Don’t try and take a huge amount of product. (The amount shown on the photo is actually quite maximum.) The key is working in light layers.
Once you have some product on the brush, tap the brush against the table to get the minerals to ‘sink’ in the brush. That way the brush releases the powder evenly while you apply it on your skin.
A kabuki brush is best for applying mineral makeup. I used a kabuki from Jane Iredale, but Ecotools also has some great options.
Easy mineral makeup tutorial
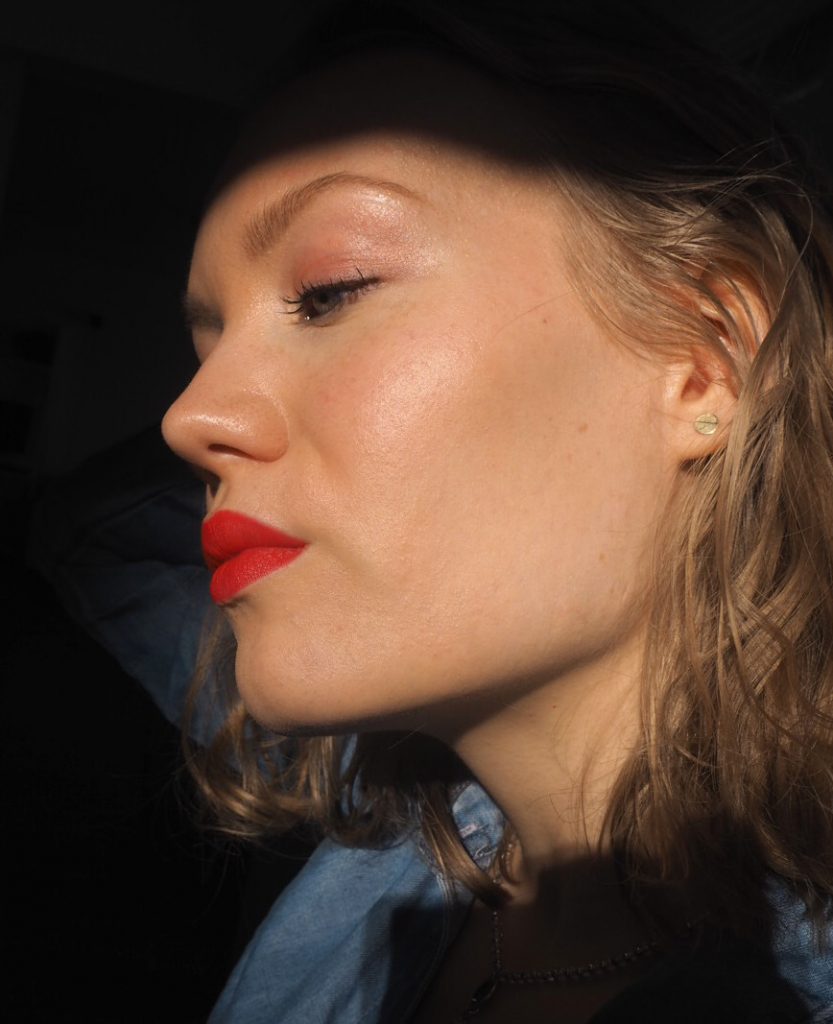
Can’t go wrong with a natural-looking glowy base and a red lip.
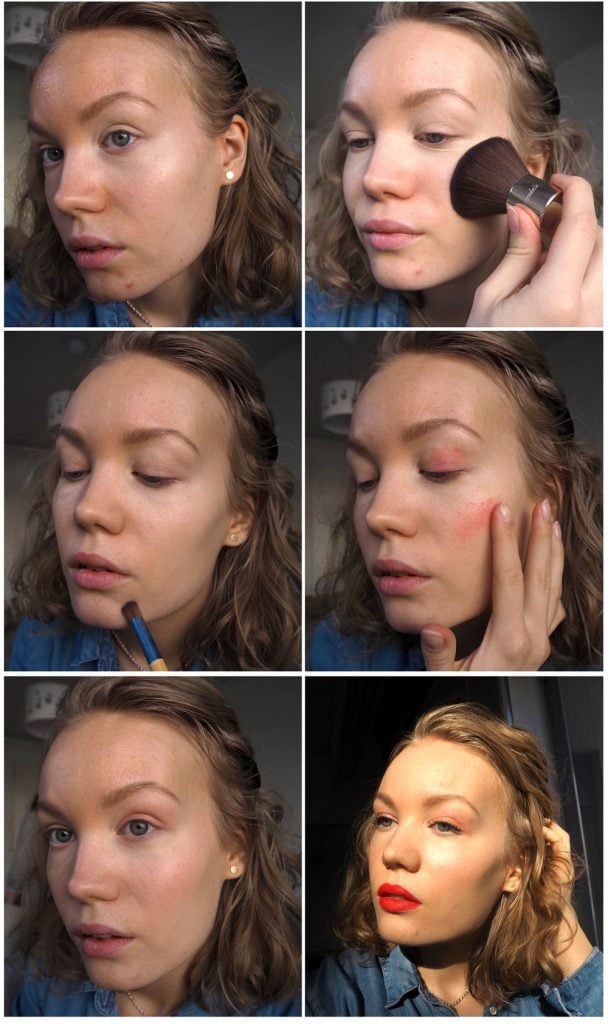
Alima Pure mineral foundation & Kjaer Weis cream blush – Step by step
I applied the mineral makeup all over my face in light layers with my big kabuki brush. After that I took a smaller Ecotools brush and concealed some areas that needed more coverage, like the sides of my nose, a few acne scars and any pimples.
I applied the cream blush on my cheeks and on my lids. Thanks to the cream consistency, no highlight is needed – the cream also brings a natural glow to the skin. Blush colors work beautifully as eyeshadows and a coral shade like this really brightens up the eyes.
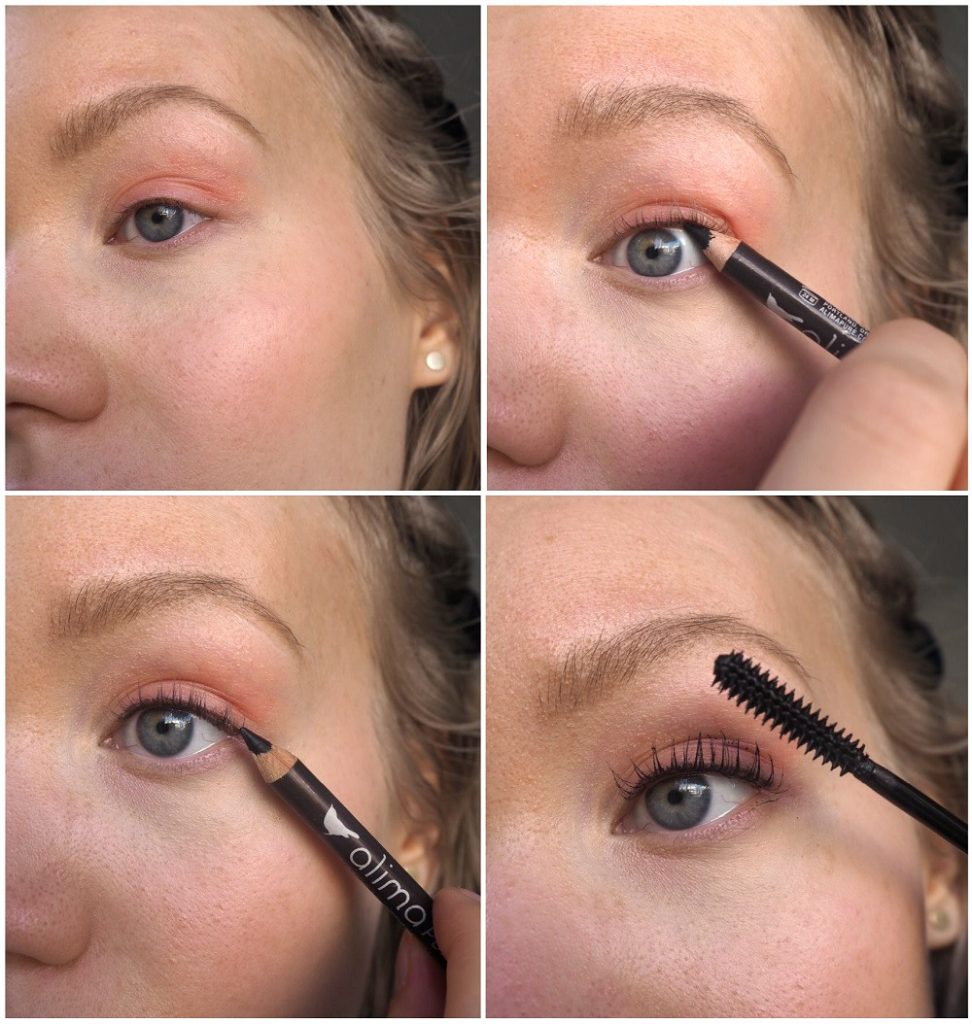
Black liner & a coat of mascara
What I love to do, is tightline my eyes. It’s a great trick for eyes, that have only a little visible lid space. This way the liner doesn’t take up that lid space, but it still enhances the lashes and makes them look more voluminous.
My favorite black pencil is Alima Pure’s Ink Pencil, because the color is really black, it stays well on my eyes and it doesn’t irritate them. The Kjaer Weis Mascara is from Kjaer Weis. Natural mascaras are tricky, but this one is one of the best I’ve tried!
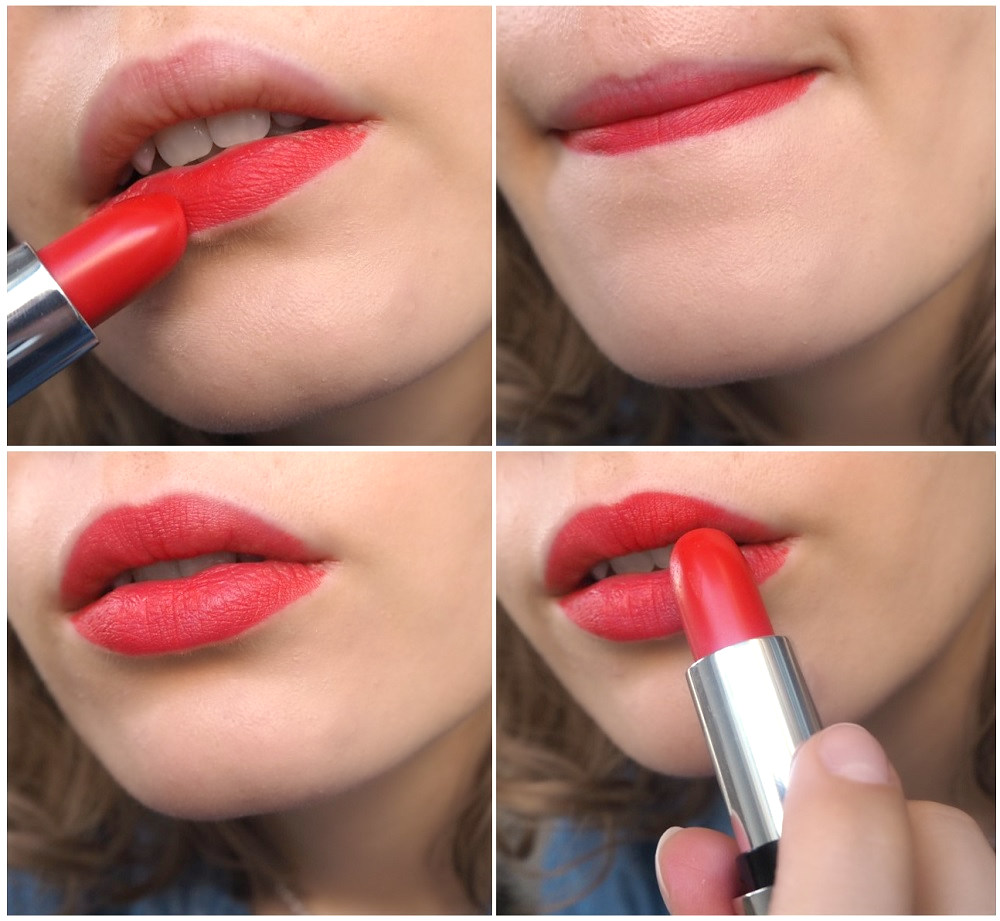
Or any lipstick, really. I always apply my lipsticks like this – it saves time.
Apply your lipstick on the bottom lip. At this point you don’t have to be too concerned about the edges.
Press your lips together, so that the color sticks to the upper lip as well.
Now you have the lipstick somewhat in place. Then you can go over the edges and perfect the red lip. If the lipstick feels too clumsy, you can take a lip brush and use that to clean the edges. I just used the pointy side of the lipstick, since it was still new and quite handy to use.
And that’s it for the simple makeup. What do you think? I love a look like this.
I’ts been a while since I’ve found a new interesting makeup line, so I’m pretty happy about the Kjaer Weis products I’ve used lately. Here are quick reviews on the products.
Kjaer Weis Mascara As I already mentioned, natural mascaras are a tricky product to produce. But this mascara is one of the best I’ve tried. I think a lot of it has to do with the mascara wand. The consistency is quite thin, but thick at the same time. What I mean is that you don’t get clumpy lashes in one layer. I usually apply two layers – like in these photos – but it still looks natural. I also like the packaging – it’s petite and pretty. The mascara costs around 34€ and refill 25€.
Kjaer Weis Above and Beyond Blush The packaging in this is really interesting, because it has this rotating cap and a mirror on the other side of it. It’s very handy to travel with, since you have a mirror and your makeup with you. Besides using this as a blush and an eyeshadow, I’ve also used it on my lips, especially on the go. The formula is very creamy and nourishing, but it doesn’t feel sticky on the skin. It’s quite pigmented, but still easy to blend. I love this coral shade that is very trendy for this spring. The blush costs 49€ and refill 29€.
The lipstick is beautiful. It’s said to have a velvet finish, which describes it well. It’s definitely more on the matte-side, which makes it very pigmented and long lasting. I don’t usually go for matte lipsticks, but this shade was so unique I had to have it. I also don’t mind the matte consistency, probably because of the moisturizing ingredients like shea butter, almond oil and jojoba oil. The lipstick costs 52€ and refill 34€.
Alima Pure Satin Matte Foundation Beige 2 Compared to some other mineral makeup foundations I’ve tried, I would say this is quite glowy. It’s said to have a smooth matte finish with subtle glow, but on my skin it’s not matte (and the glow is real). The consistency is great and the foundation blends easily on my complexion. I think I need to let my sister try this, because she has dry skin and I have a feeling this would work amazingly for drier skintypes. Alima Pure Foundation costs 34,90€.
Alima Pure Natural Definition Eye Pencil Ink I don’t know if it’s just me, but I feel like talking about a black pencil is somewhat boring. Then again it’s one of the makeup staples and we all appreciate a good black pencil. Right? Well, I’ve used this black pencil for years now and I think it’s the best. It’s black, it lasts well, it suits my sensitive eyes and it can be blended to get a soft line. It’s not too soft and it’s not too hard either. It’s the perfect black pencil, really. The pencil costs 22,50€.
This website uses cookies to improve your experience. We'll assume you're ok with this, but you can opt-out if you wish.Accept
Privacy & Cookies Policy
Privacy Overview
This website uses cookies to improve your experience while you navigate through the website. Out of these, the cookies that are categorized as necessary are stored on your browser as they are essential for the working of basic functionalities of the website. We also use third-party cookies that help us analyze and understand how you use this website. These cookies will be stored in your browser only with your consent. You also have the option to opt-out of these cookies. But opting out of some of these cookies may affect your browsing experience.
Necessary cookies are absolutely essential for the website to function properly. This category only includes cookies that ensures basic functionalities and security features of the website. These cookies do not store any personal information.
Any cookies that may not be particularly necessary for the website to function and is used specifically to collect user personal data via analytics, ads, other embedded contents are termed as non-necessary cookies. It is mandatory to procure user consent prior to running these cookies on your website.