*adlink
If your outer corners turn slightly downward, the most flattering makeup usually lifts the eye with matte shadow, keeps some definition on the lower lashline, and avoids dragging eyeliner down. That is the basic trick for downturned eyes.
My own eyes are deep set, slightly hooded and downturned, so this is the placement I come back to whenever I want the shape to look more lifted. If your wing keeps disappearing or your outer corner starts to look heavy, start here.
Quick summary for downturned eyes
- Lift the outer corner with matte shadow instead of building the whole look around a big wing.
- Bring some depth to the lower lashline so the shape stays balanced.
- Make sure a little shadow still shows when your eyes are open and relaxed.
If your eyes are also deep set or lightly hooded, compare the full makeup for eye shapes guide first, then read this eyeshadow trick for hooded and deep set eyes and these dos and don’ts for deep set eyes after this one.
How to lift downturned eyes with eyeshadow

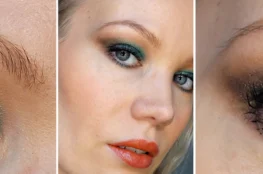
Here are my eyes. In the outer corner, the upper lid keeps going down and ends quite low, and because my eyes are also deep set that outer corner can look a little hooded. The goal is to create lift by hiding that drooping area with matte shadow.

The placement is simple. Draw a line from your lower lashline toward the point where the lid droops, and then fill in that problem area. It is the oldest makeup trick in the book: hide something by creating a shadow with a matte color.
You can make the shape rounder or sharper and lift it more or less depending on your style. The important part is that the shadow sits high enough to still show with relaxed, open eyes.


How to do eyeliner on downturned eyes
The easiest liner mistake on downturned eyes is following the outer corner downward. Instead, keep the liner thin through the inner and middle lid and lift only the outer third toward the end of your brow.
- Keep the line thin so it does not eat up lid space.
- Build the lift with shadow first, then let the liner follow that same angle.
- If a sharp wing feels heavy, skip it and focus on mascara or lashes at the outer half.
If your eyes are also round and deep set, this round deep set eyes tutorial shows the same lifting idea in a softer shape.
Simple makeup tutorial for downturned eyes

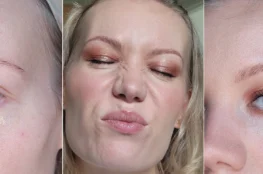
- Draw a line from your lower lashline to where your upper lid droops and toward the end of your brow. Fill in that area and start to blend the shadow wider and higher.
- Blend well and add more depth if needed. Keep the outer corner dark and bring some definition to the lower lashline too.
- Add a lid color. I used a beautiful pink shimmer.
- Finish with liner, mascara and lashes if you want. I also added glitter in the inner corner.
I also have another tutorial using the same basic technique. I did that one with just NYX Jumbo Eye Pencils in Dark Brown and Iced Mocha. It ended up looking very grey in photos, but the placement still works really well.
If you want to see this in action, I have a video tutorial in my Instagram Highlights (Eye Tutorial) @charlottaeve.


Shopping list for this technique
- Urban Decay Primer Potion for grip and smoother blending.
- NYX Jumbo Eye Pencil in Iced Mocha if you want a fast matte base plus lid shimmer.
- NYX Glitter Goals Liquid Eyeshadow for light in the inner corner or on the lid.
- Tony Moly Panda’s Dream Long Lash Mascara for lift and separation.
- Coastal Scents brush set if you need an affordable beginner set.
Here is the full product breakdown from this look.
PRODUCTS USED
*Clarins Everlasting Foundation+, Sand (Great foundation for combination & oily skin, read my Clarins Everlasting Foundation review!)
*Madara City CC Medium Beige
*Zuii Organic Diamond Sparkle Powder, Raspberry (on the lids, cheeks & lips)
mad4eyebrow Natural Brow Filler, Blond
GOSH Brow Hair Stroke, Greybrown
Holika Holika Wonder Drawing Skinny Eyebrow, Dark Brown
*NYX Glitter Goals Liquid Eyeshadow, Polished Pin Up (Added some glitter in the inner corner)
*Tony Moly Panda’s Dream Long Lash Mascara
*Lily Lolo Lip Liner, True Pink
As for makeup brushes, I use brushes from Zoeva, EcoTools and Real Techniques. If you’re someone just starting out, this affordable set from Coastal Scents is also great. I used it when I started and I still use it to this day.

If you want more eye-shape tutorials, start with my makeup for eye shapes guide. You can also come say hi on Instagram @charlottaeve; that is where I post quick demo videos and answer follow-up questions now.