How to highlight your face & highlighting tips

highlighting tutorial and tips

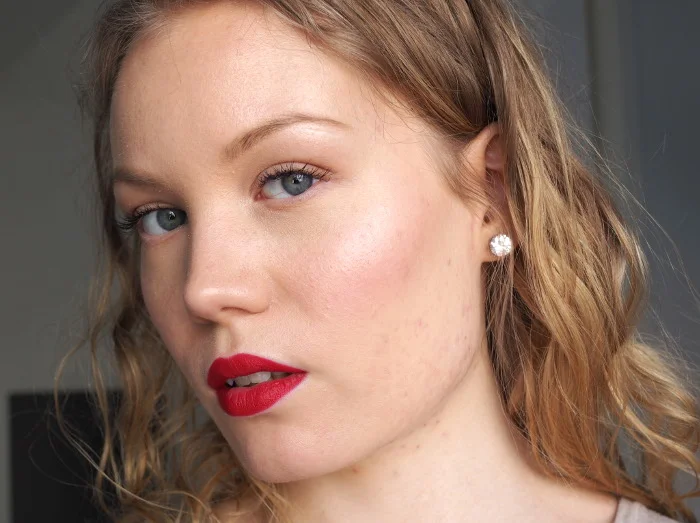
One of the coolest things about having my skin back after that horrible acne, is that I can use highlighters again. I’m not at all about that over-the-top highlighting style, but I still apply quite a lot of it on my face.

My highlighting style makes my skin look glowy and like the light hits it in just the right spots. The key in making highlighter work for you instead of against you (been there!) is to use the right product for your skintype, apply it in the right spots and to not go overboard with it. Though to be honest -it happens to the best of us – sometimes it’s so hard to resist all that sparkle.

In this post I will show you step by step how I apply highlighter on my face, I will show you my favorite highlighter and give some highlighting tips, including the best highlighter for textured or oily skin.

How to highlight your face
how to highlight your face tutorial

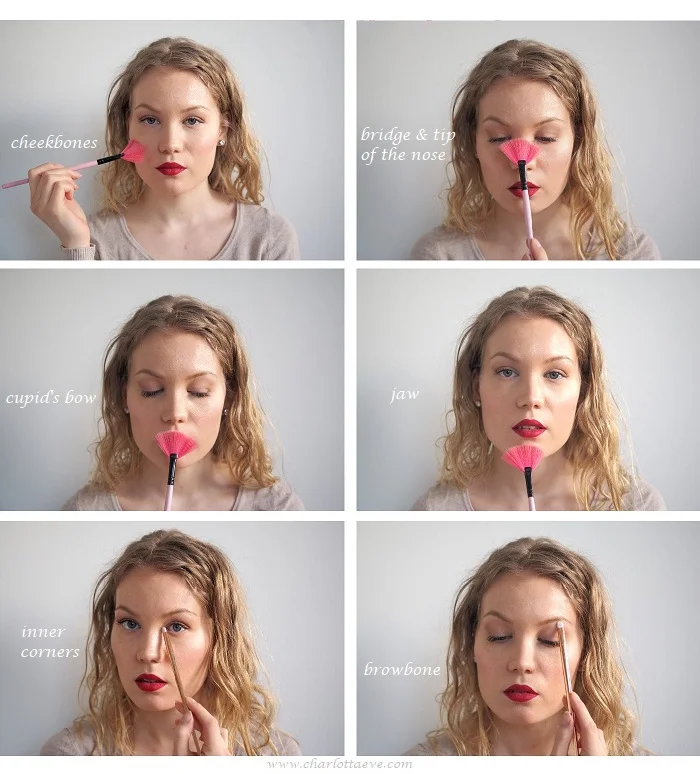
The idea in highlighting is to highlight the high points of your face. To make you look glowy and beautiful. Depending on your glow-level, you can highlight all six of the places mentioned here, or if you just want a subtle glow, you can leave your nose or jaw untouched. I don’t necessarily always highlight my face like this, but when I want that glowy look, these are the spots I hit with my brush.

  1. Cheekbones. Highlighter goes on the highest point of your cheek and it should be blended so it doesn’t look just a straight streak on your cheek. Blend it upwards towards your temples and to your cheeks – I always make it blend with my blush too.
  2. Bridge of the nose & tip of the nose. If you like your nose and want to accentuate it, you can hit it with some highlight. My nose is quite straight and petite and I like to make it look even straighter and cuter by applying some highlighter right on the bridge of it (make sure you make a thin straight line!) and a touch on the tip of it.
  3. Cupid’s bow. Probably my favorite place to highlight. I remember highlighting my cupid’s bow with a white eye pencil when I was younger and my friend was like: ‘whatcha doing?!’ and I couldn’t really explain it to her, but somehow I knew it made my lips look bigger and better. And it makes my cupid’s bow accentuated, which I like.
  4. Jaw. I could probably skip this one, but I like to do it just to draw attention to the center of my face – since my face is square-shaped. Having highlighter kinda all over my face makes the whole makeup look more put together, if it makes sense.
  5. Inner corners.
    You’ll probably add some light shimmery eye shadow on your inner corners, when doing your eye makeup, but here’s an idea: use the highlighter you used on your face! Again, it makes everything match together beautifully.
  6. Brow bone. The same applies here, as in number 5. But when it comes to brow bone highlighting, there’s an important thing to remember. If your eyes are very hooded or very deep set, applying a lot of highlighter on your brow bone might make your eyes sink in even more. Then again – a tiny touch of highlighter on your browbone can lift up your eyes. If your eyes are very hooded/deep set, matte highlighter (a light color) could work better. Experiment with this and see what works for you! I have deep set eyes and I applied the highlighter on my browbone too, but I applied just the tiniest amount.

+ forehead

My forehead is the only place, I don’t touch. It just so happens that it glows naturally, all by itself. If your skin isn’t as oily as mine, you can hit your forehead with a little highlight: try applying it right in the center or above your brows.
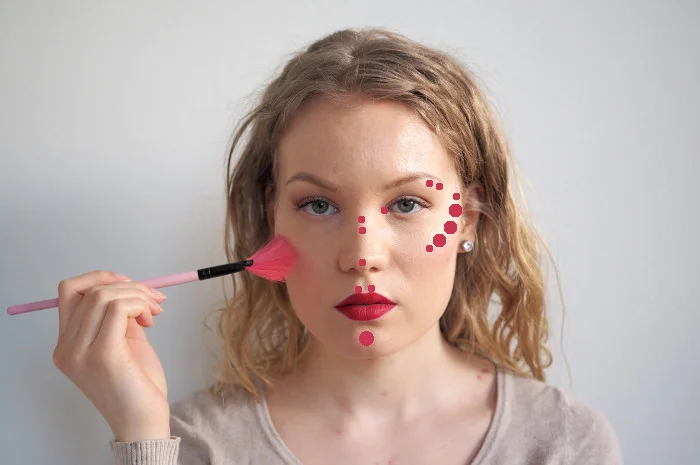
highlighting points on face

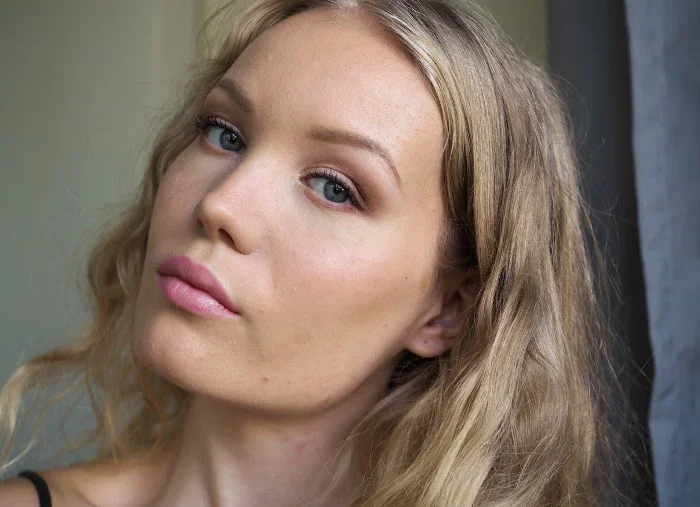
I look like I could kill, but I’m just very focused here. I made this so you can clearly see, where the highlighter exactly goes on my face.

My all-time favorite highlighter
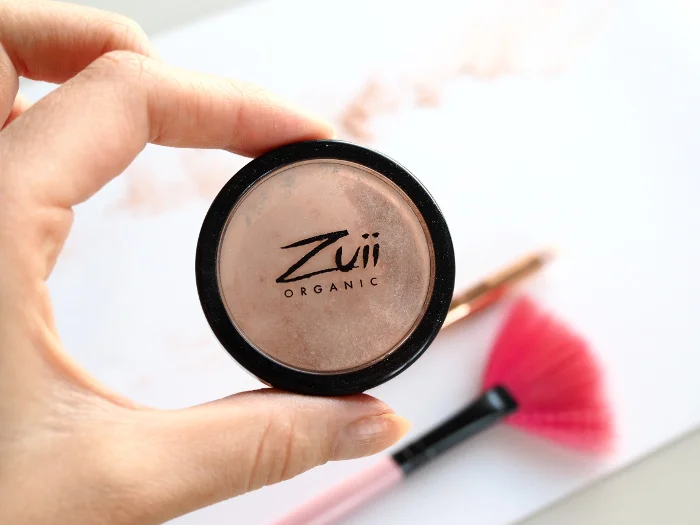
zuii organic highlighter

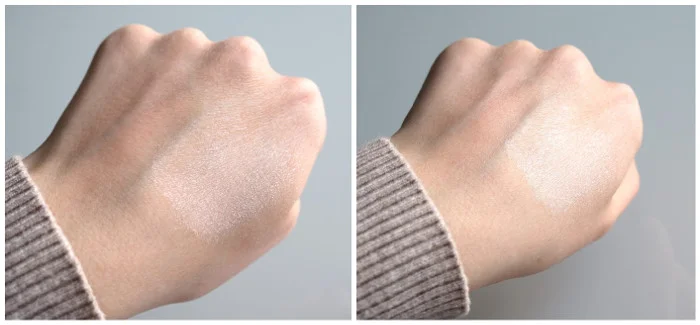
zuii diamond sparkle blush berry swatch

I have a lot of highlighters and I use all of them, but there is one product, that is above everything and it is Zuii Organic’s Diamond Sparkle Blush in the shade Berry. I own that product in almost every color, but that is the one color that is just perfect for light complexions. It is light pink color and it reflects light like no other. I always – always – use this on brides too. It’s a perfect product for wedding makeup. I also have my own name for this product, I call it the magic dust.

This highlighter is a loose sparkling powder, which might look intimidating at first. It’s so sparkly. But the sparkles are actually quite fine, so this product works for anyone, no matter the age. It looks gorgeous on your skin. If your skin is very textured, you can either try this or the other other product, mentioned below.

Zuii Organic Diamond Sparkle Blush, Berry* (25,94€, ecco-verde.com)
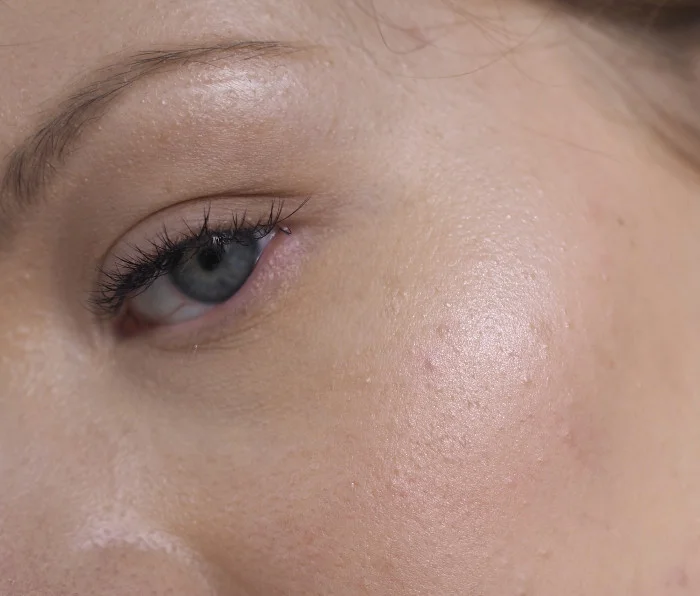
highlighter close up

Highlighting tips

Highlighter can be your enemy, if your skin is super textured and has some problems. Sometimes shimmery products can emphasize the problem. I know it’s boring to just leave the highlighter out, so there are options! One product, that I’ve found work for me well, was Maybelline’s Strobing Stick. I have a whole post about it, since it was a breakthrough for me, when I had skin problems.

If you’re all about that extra glow, try applying your highlighter on slightly wet skin. First spray your face with a setting spray or some other moisturizing spray, let it sit with just a second and then apply your highlighter. Extra-glow guaranteed.

Use a fan brush to apply your highlighter. A fan brush is great for cheekbones or for bigger areas. It makes blending easy and it applies the highlighter lightly.

Use a smaller brush for details. For details, such as nose or cupid’s bow – use a smaller brush! That way you don’t accidentally give yourself shimmer whiskers or widen your nose. I actually messed this up in the photos, sorry!
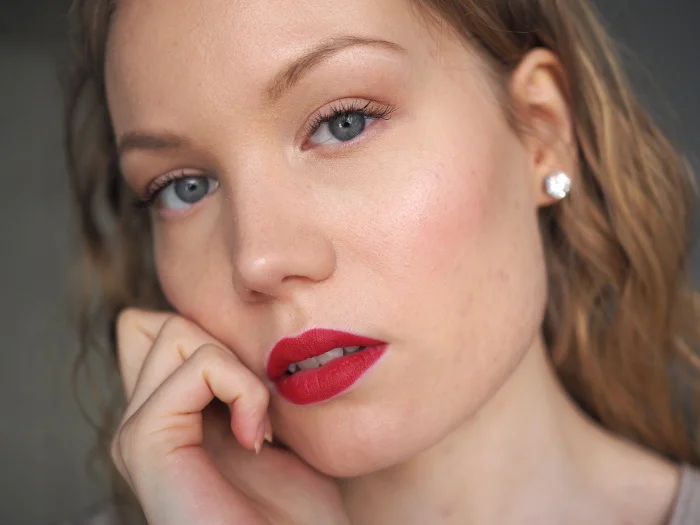
highlighting tips

Product list for the full face

Pandhy’s loose mineral powder, Sandra
Zuii Organic Concealer, Beige & Fair

Everyday Minerals Concealer, Multitasking
Jane Iredale ContourKit, Cool
TooFaced Sweetheart Blush, Candy Glow
Zuii Organic Diamond Sparkle Blush, Glow

mad4eyebrow Brow Filler, Blonde
Clarins Joli Rouge Velvet, Deep Red


Hooded Eye Shadow Placement Trick for Visible Color

Finished eyeshadow look for hooded and deep set eyes

If your eye shadow disappears when your eyes are open, the usual crease placement may be too low. For hooded and deep set eyes, this eye shadow trick places the matte contour shade slightly higher, following the natural shadow below the brow bone so the color stays visible and the eye looks balanced.

This technique works especially well for hooded eyes, deep set eyes, monolids, or anyone with very little visible lid space. In this post I’ll show you where to place the shadow, how high to take it, and how to keep the eye looking lifted instead of heavy.

  • Skip the natural crease if it sits too low.
  • Place the matte shadow where your brow bone creates a natural shadow.
  • Blend the lid color up to that shape and keep shimmer off the contour area.

Already know the placement and want the tools? Jump to the primer, palette and brush picks.

If your eye shape is a mix of several things, start with my makeup for eye shapes guide to compare the options in one place. I also recommend reading how to makeup for downturned eyes and broader deep set eyes dos and don’ts after this guide.

I learned this the hard way on my own eyes. My eyes have very little visible lid space, so the classic “put the dark shadow in the crease” advice never really worked for me. Once I stopped forcing my shadow into the crease and started following my actual bone structure instead, everything clicked.

And even though I’m a professional, my own eye shape has taught me a lot. Sometimes makeup looked exactly right, and other times I was just guessing. This trick was the moment the logic finally made sense to me.

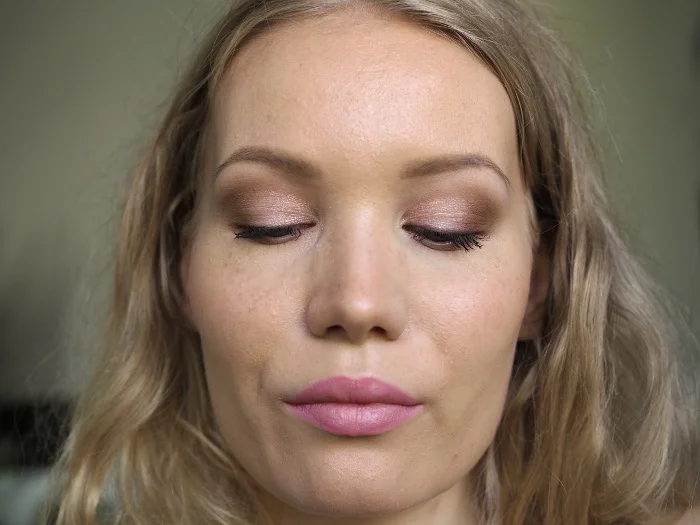
Finished soft pink eye makeup for hooded and deep set eyes

How to apply eyeshadow on hooded and deep set eyes

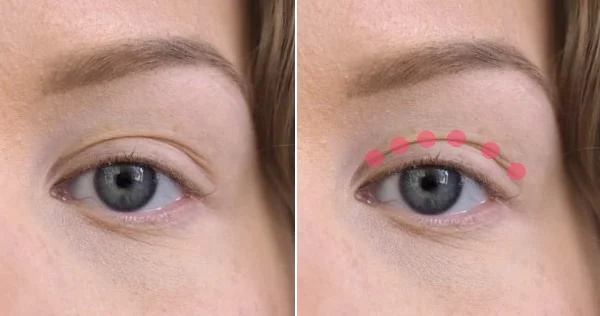
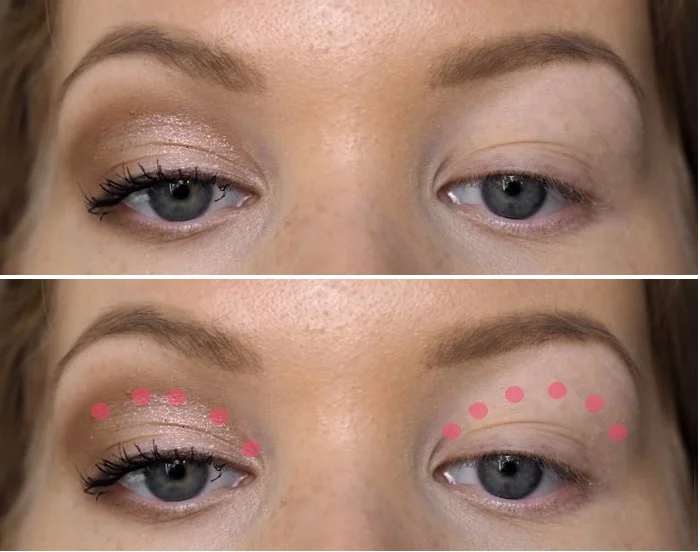
Dots mark eyeshadow placement above the low natural crease

Forget about the natural crease

As you can see, my natural crease is very low. Deepening that crease only makes my eyes look smaller, so for this eye shape the crease is not the place I want to emphasize. If your eyes are hooded or deep set, it often helps to stop treating the natural crease as the automatic placement line for dark eyeshadow.

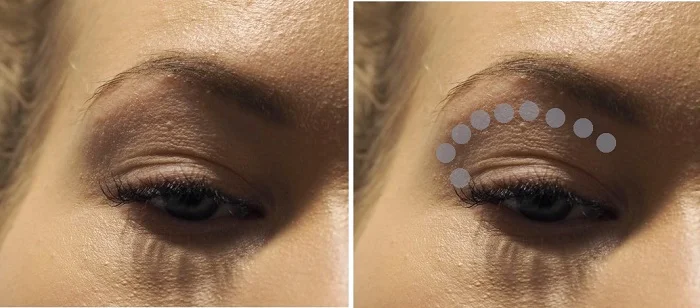
Eyeshadow placement dots above the natural crease on a hooded eye Eyeshadow placement follows the brow bone on a hooded eye

Follow your natural bone structure

The better rule is to follow your natural bone structure, just like you would with contour and highlight. Put the shadow where it naturally occurs on the eye: right below the brow bone, where the eye starts to sink back. That placement looks softer, more flattering, and more believable because it works with the structure you already have.

If you want even more guidance for this eye area, my posts on bold eye makeup for deep set eyes and round deep set eyes show how the same logic changes slightly depending on the finished look and eye shape.

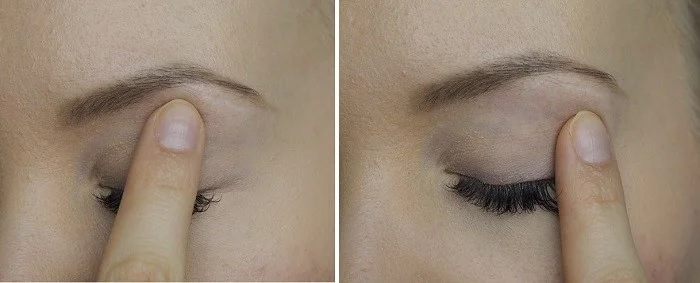
Finding the brow bone and natural shadow with a fingertip

Find the natural shadow right below your brow bone

To get the placement right, find the exact spot with your finger or in slightly dim lighting. You can usually feel where the bone ends and the eye sinks in a little, and you can often see that shadow very clearly in softer light. I’ve literally taken my brush to the hallway, marked where that shadow hits, and then gone back to my makeup table to blend from there.

This is why the trick makes eyeshadow look better: the makeup sits where a shadow would naturally belong. The blend looks softer, the shape looks more lifted, and the eyeshadow stays visible instead of disappearing into the fold.

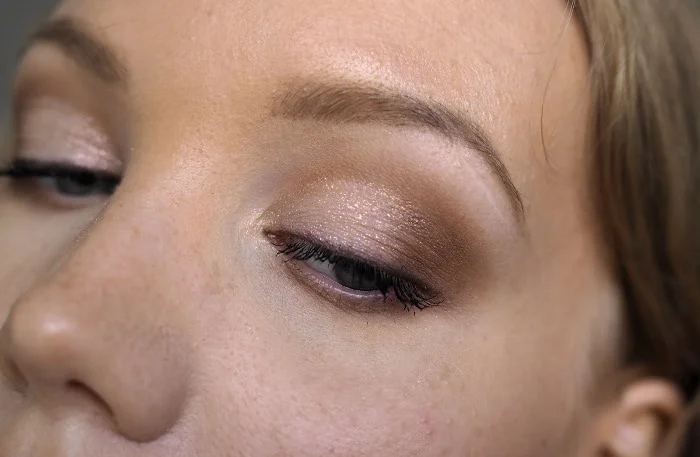
Comparison of eyeshadow placement above the crease on hooded eyes

Here is a close-up so you can see how high the eyeshadow can actually go. It is nowhere near my natural crease.

Finished soft pink eyeshadow look on hooded and deep set eyes

Here is a simple tutorial using exactly this placement.

For a more colorful example with the same placement logic, see my easy blue makeup look tutorial.

Simple 3-step tutorial for hooded and deep set eyes

Three-step eyeshadow tutorial for hooded and deep set eyes

  1. Contour the eye by following your natural bone structure. Use a matte shade and create the “crease” where a natural shadow occurs. That is where the color should be darkest. Fill in the outer corner and blend well so the contour stays soft. Add some color to the lower lash line too, but keep it subtle unless you want more drama.
  2. Apply your lid color all over the lid up to the new contour shape. Blend the edges carefully so the transition looks soft. If you use shimmer, keep it mainly on the lid and do not take it over the matte contour area.
  3. Finish with inner-corner highlight, liner if you want it, and mascara. Here I used a soft blended liner with black eyeshadow.

Close-up of the finished eyeshadow placement on a hooded eye Finished eyeshadow look for hooded and deep set eyes

Best products for this technique

You do not need a huge makeup bag for this. The most helpful things are a reliable eye primer, a soft matte contour shade, and a brush that blends without making the shadow patchy.

Links marked with * are affiliate links. I may earn a commission at no extra cost to you.

Best eye primer: *Urban Decay Primer Potion. This is the base I rely on when I want shadow to stay smooth and visible all day.

Best premium palette: *Anastasia Beverly Hills Soft Glam Eyeshadow Palette. Great if you want strong pigmentation and easy blending.

Best neutral palette: *Urban Decay Naked3 Soft Pink Eyeshadow Palette. This is a versatile everyday palette when you want flattering contour shades for this technique.

Best soft glam option: *Too Faced Born This Way The Natural Nudes Eyeshadow Palette. A nice pick when you want a little more softness or shimmer on the lid while keeping the contour matte.

Best blending brush: *SEPHORA COLLECTION PRO Crease Brush #19. This is the kind of soft blending brush I like for this technique on hooded and deep set eyes.

Best eye brush set: *SEPHORA COLLECTION The Eye Brush Set. A focused eye brush set is useful when you want clean placement and soft blending for hooded and deep set eyes.

FAQ

Where should eyeshadow go if your crease disappears when your eyes are open?

Usually higher than your natural crease. Place the matte contour shade where the brow bone creates a natural shadow so the color stays visible with the eyes open.

Should shimmer go above the crease on hooded eyes?

I usually keep shimmer on the lid and keep the contour area matte. That keeps the shape cleaner and stops the eye from looking puffier or heavier.

Does this work only for hooded eyes?

No. This also works for deep set eyes, monolids, and anyone whose visible lid space is limited. The exact placement changes slightly, but the principle stays the same: follow the structure you have instead of forcing a generic crease shape.

What should I read next if my eye shape is mixed?

Start with the full makeup for eye shapes guide if you want to compare the options in one place. Then read downturned eyes, deep set eyes do’s and don’ts, and round deep set eyes. Most people are not just one exact eye shape, so comparing a few close matches usually helps.

I hope this post helps you as much as this realization helped me. If you try the technique, send me a message on Instagram or tag me there so I can see your look.

And hey – happy Valentine’s Day! I’m going to do a little date night thing with Risto, eating dinner at home in candlelight. So cheesy, but so lovely.

Want more product-focused picks after this tutorial? Browse my beauty reviews and favorites.